Introduction
My accounting software is useless without automatic transaction fetching. Open Banking, enabled by DSP2, is theoretically an option, but the official certification process is a major hurdle. Given that they offer a mobile and web app, I suspect there might be an API I can leverage.
Figuring out how this works might be fun, after all, the last bank auth process I looked into was… peculiar 🙃.
Step 1: Login
As most French banks, the authentication flow typically involves:
- Entering a digits-only username.
- Inputting a digits-only password using a visual keyboard.
- Potentially validating a second factor via the bank’s app.
Step 1: Magic cookie the gathering
Before sending any login info, Boursorama requires you to do a few fixed requests to gather some magic cookies. There returned values seem quite stable for a given IP.
$ curl 'https://clients.boursobank.com/connexion/'
[...]
<script>
    document.cookie="__brs_mit=<128 bit hex key>; domain=." + window.location.hostname + "; path=/; ";
</script>
[...]
To continue, this key must be included in every subsequent request as the __brs_mit cookie.
Doing the same request again, but providing __brs_mit yields 2 new cookies:
brsxd_secure=<some 142 char long key, not base64>
navSessionId=web<sha-256>
In addition to those, we also need a third value: form[_token]!
This token can be found in the returned HTML page. It looks like a JWT token (b64, sections separated by a dot),
but is not.
This token will have to be returned with the input/password POST request.
Step 2: SVG based obfuscation
Since the beginning, no user information was required. It was simply a matter of making the right requests and collecting bits in the cookies or returned HTML.
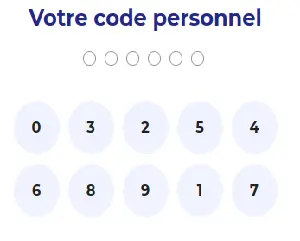
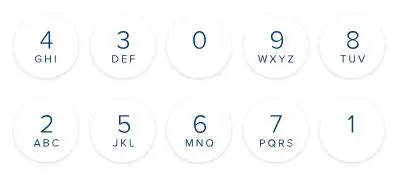
Now comes the last hurdle: the keypad.
As usual, the user needs to type the password using a visual keyboard. No direct key input is allowed. Perhaps to prevent a keylogger from discovering your highly secure 8-digit password?
What’s interesting is that the request doesn’t contain the password itself, but rather a series of 3-letter groups.
So if you type 12345567, you get NXS|GKY|KJE|YOL|JXA|JXA|YFM|YSP.
The sequence changes with each page reload, but the digits remain unshuffled, and the same digits are always encoded
the same way.
NXS|GKY|KJE|YOL|JXA|JXA|YFM|YSP
 1 | 2 | 3 | 4 | 5 | 5 | 6 | 7
                 ^   ^
                 same!
The idea is that the server sends down 10 SVG files, each associated with a 3-letter sequence. Then, when the user clicks on an SVG button, the JS records the associated letters and appends them to the “password”.
This SVG-group association can be found by loading
https://clients.boursobank.com/connexion/clavier-virtuel?_hinclude=1 (don’t forget to include all the cookies we
gathered so far).
On the returned HTML page, you’ll find a list of SVGs, each linked to a data-matrix-key attribute:

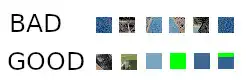
Now that we have 10 SVG images and their corresponding groups, how do we know what digits each image represents?
# SVG are always the same, and the path length is different for each digit.
B64_SVG_LEN_MAP = {
        419  : 0,
        259  : 1,
        1131 : 2,
        979  : 3,
        763  : 4,
        839  : 5,
        1075 : 6,
        1359 : 7,
        1023 : 8,
        1047 : 9,
}

key = B64_SVG_LEN_MAP[len(my_svg_path)]
Step 3: Loggin in!
Equipped with the magic cookies and a SVG-to-digit conversion method, we can delve into the login step!
The login request is a multipart form POST request.
It requires a few fields to be accepted.
Some make sense:
- clientNumber: the username/client ID.
- password: the 3-letter chain we created by understanding the digit images.
- matrixRandomChallenge: a long hex key gathered in the HTML along the keypad. Probably the key used to generate the 3-letters group, allowing the server to be stateless.
- _token: one of the many magic values we got by fetching a particular URL (part 1, ‘form[_token]’)
- ajx: always ‘1’
- platformAuthenticatorAvailable: “-1”, I guess something to say if my device supports passkeys?
Some are just plain weird:
-
fakePassword: one instance of the
•character for each digit in the password. So ‘••••••••’ since Boursorama enforces the password length to be 8.
And some are probably related to some analytics and can be discarded:
- passwordAck: A JSON containing the timestamp of the click on each digit, and the X/Y coordinate of the said tap relative to the button.
Initially, I feared that this last field would require a more complex “human” check, such as emulating keypad layout
and calculating realistic click delays based on button distances.
However, it turns out that a simple {} is a sufficient value for passwordAck.
The final form request looks like this:
form[clientNumber]: <actual client number, plain text, e.g: 12341234>
form[password]: "CEF|UGR|O....E|IKR|KNE" # 3-key sequence we computed before.
form[ajx]: 1
form[platformAuthenticatorAvailable]: "-1"
form[passwordAck]: "{}"
form[fakePassword]: "••••••••"
form[_token]: <kinda JWT token, not quite, fetched from the previous steps>
form[matrixRandomChallenge]: <very long key, 13k characters, looks like B64>
This as POST request to `https://clients.boursobank.com/connexion/saisie-mot-de-passe’, along with the
previously gathers cookies should yield us 2 final cookies:
brsxds_d6e4a9b6646c62fc48baa6dd6150d1f7 = <actual JTW token>
ckln<sha256> = <HTML quoted 2048-bit RSA?>
The first is a simple JWT token. But what’s intersting is the cookie name: brsxds_d6e4a9b6646c62fc48baa6dd6150d1f7!
Did you know d6e4a9b6646c62fc48baa6dd6150d1f7 is the MD5 hash of prod ? 🙃
Turns out naming the cookie brsxds_prod wasn’t enough, they needed to hash the suffix.
The second cookie is a bit more mysterious. The name seems to be a SHA-256 hash prefixed with ckln. Not sure why.
The value itself looks to be a twice URL-encoded 2048-bit base64 key, but I wasn’t able to figure out more.
But as always: just add those to the next request, and everything works!
Step 4: Fetching my data
As any 90’s movie hacker would say: I’m in! Time to grab some transaction and account information to feed my software.
Unfortunately, Boursorama doesn’t appear to offer a JSON API for easy data access, it seems to rely heavily on
Server-Side Rendering.
To retrieve my account list, I fetched https://clients.boursobank.com/mon-budget/generate and parsed the HTML.
As for recent transactions, there’s at least a CSV exporter available:
params = {
        'movementSearch[selectedAccounts][]': account_id,
        'movementSearch[fromDate]': from_date.strftime('%d/%m/%Y'),
        'movementSearch[toDate]': to_date.strftime('%d/%m/%Y'),
        'movementSearch[format]': 'CSV',
        'movementSearch[filteredBy]': 'filteredByCategory',
        'movementSearch[catergory]': '',
        'movementSearch[operationTypes]': '',
        'movementSearch[myBudgetPage]': 1,
        'movementSearch[submit]': ''
}

url = 'https://clients.boursobank.com/budget/exporter-mouvements'
session = requests.Session()
resp = session.request('GET', url, cookies=cookies, params=params)
Note: if the range is invalid, or returned no results, the response is not a CSV anymore, but an HTML page showing an error message.
Final thoughts
As always with bank logins, I find this very convoluted, but not sure of the added benefit. In fact, most magic cookies were simply fetched from the server once, and sent back as-is in all subsequent requests, and the only challenge (SVG->key) is quite trivial.
I’d be curious to know the rational behind all that. Initialy I thought maybe the magic cookies are used to prevent some kind of MITM or replay attack? But unlike OVH which uses time-based request signatures, those keys seems to be quite stable.
In the future, I’d like to explore the mobile app, see if there is some JSON API I could use, because parsing HTML feels wrong.
I Hope you found this post interesting!